Well, for one, the German recipe is my mom's recipe, and we all know that mom's and grandma's are just the BOMB when it comes to cooking and baking;) Secondly: My Cheesecake recipe is made with Greek Yogurt instead of cream cheese and is WAY less sweet than the American version!
(Short excursion to Christmas 2014, when I brought home some American candy to my family in Germany, and they said they couldn't eat it because it is too sweet - hence most of the German candy or baked stuff is way less sweet than American pastry and candy)
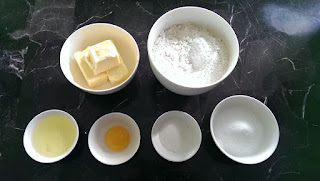
Anyway - here are the ingredients you will need. Since I usually use metrics, I wrote down the measurements in metrics as well as in - well, American measurements (I have honestly no idea what they are called. Whoops - I am playing the German Card on that one ;) )
So here we go:
For the Dough you will need:
- 300g (2 1/2 cups) Flour
- 6g (2 tsp) Baking Powder
- 50g (1/4 cup) Stevia Sugar (I used this brand)
- 1 pinch Salt
- 1 Egg
- 1 tbsp Milk (I used 2% Milk)
- 150g (1.5 sticks) Margarine
- 12g (1 tbsp) Vanilla Sugar (mix together Vanilla Beans and regular granulated Sugar)
For the Filling you will need:
- 2 Packages Vanilla Pudding Powder (German Brand if possible)
- 500ml (17 oz) Milk (I used 2% Milk)
- 100g (1/2 cup) Stevia Sugar
- 1 1/2 tbsp Lemon Extract
- 750g (26.5 oz) Greek Yogurt (I used this brand)
- 3 Egg-whites
- 1 Egg-yolk (to brush on cheesecakes later on)
For the Halloween Deco part you will need:
- 1 package of Dark melting chocolate morsels
- An apple (or almonds)
- Toothpicks
- A decorating/icing bag / or a Ziploc bag
- a decorating tip
- parchment paper
This may seem a bit overpowering since there is a lot going on in this recipe, but it is well worth it! And once you got a hang of it, you will be able to bake this Cake with your eyes closed (that might be just a liiittle over-exaggerated;)).
For my mini Cheesecakes I used 2% Fat Milk and Greek Yogurt, but if you want to slim down the recipe some more, you can use the Fat Free version (but I don't think that Fat Free tastes as good, and it usually has a bunch of weird add-on ingredients in there). I also used Margarine, because that is a thing us Europeans do. We use Margarine for everything, because it is supposedly better for you, but there are many opposing viewpoints about this, so I will not get into this now ;).
Okay now I'll take you with me to the step-by-step process (One day I will make a YouTube video, that just seems easier to me).
For the Dough:
First of all: Preheat the oven to 395 Fahrenheit (do you just say "F"? not sure).
I will make it super easy for you: Mix together ALL ingredients. My mom would tell me that I would have to start off with the dry ingredients and then add the liquid ones, but "ain't nobody got time for that" - Sooo I just mixed everything together the way I wanted to (Yup mum, I am a rebel!;)) - and it turned out just fine!
Knead the Ingredients together with your hands - this is usually the easiest way, and add as much Milk as needed, to get a firm, non-sticky dough (consistency of sugar cookie dough - which it pretty much is). You may have noticed that in the first picture I divided the egg-white and egg-yolk, and I have truly no idea why I did that - practice? Looks? Don't ask me. It seems like I am getting old ;).
This is what the dough should look like once it is done! If you used melted butter or warm butter, you need to put the dough in the refrigerator for about half an hour to be able to work with it later.
Now it is time to pre-make and bake the dough, so it can get nice and crispy and the liquid cheesecake filling won't run through it later. Line your Cupcake tin (did I mention you DO need a cupcake tin? Nah, right? Can I blame that on my age again?..) with cupcake liners (duh), roll the dough into little balls (about 1inch diameter), and press it down on the bottom of each liner.
Done? Great! Now - for the lack of a better word: "Fork" the bottoms (this truly does not sound good - let me explain it). Use a Fork to punch some holes into the flat dough, so it does not rise and no bubbles are forming.
Once you are done with the "Forking" (that word really grows on me;))- bake the Dough for 6-7 minutes, or until it is golden brown. Take it out of the oven and let it cool down a little bit. Repeat with the rest of the dough balls.
Filling:
Now it's time to tackle the filling part (This requires either help or multitasking abilities)- My great friend Darja helped me out - she is also the hand-model in a few of the following pictures (hah! I told you I would post it ;)).
Also: Decrease the oven heat to 305 F (I will just do it like that from now on - you know what I mean)
Grab a sauce pan, add the rest of the milk and let it come to a boil. Once it boils, add the Vanilla/Sugar/Milk mixture to it and STIR! Turn the stove to a medium setting and continue stirring with a whisk, until there are no lumps left anymore and the pudding mix has turned into actual pudding (creamy, not liquid anymore).
Turn off the stove and remove the sauce pan from the stove. Add the Greek Yogurt and the Lemon Extract and stir until it's well combined. At this point you can decide yourself if you want it to taste more Lemon-y (There is no raw egg involved yet, and I am super weird about raw eggs).
Now get another bowl, add the egg-whites and beat them until they are stiff (this sounds so violent:P). Fold the stiff egg-whites into the Pudding mixture.
Filling: check
Now that your Filling is done, add it to your cupcake tins (I filled them up almost completely)
Bake the mini cheesecakes for 20-25 minutes. Since a toothpick test does not really work for this kind of cake, you will have to wait until the filling is rising. This means that the egg-white is expanding, which means it is cooked through (If you ask me why, I will give you my dad's favorite answer: Physics! (although in this case it might actually be chemistry, but what do I know - clueless Marketing major)).Once the mini cheesecakes are baked, take them out of the tin and let them cool down completely. While they are cooling down, you can prepare your deco-station.
Roll out some parchment paper, melt the dark chocolate (in the water bath if you are fancy and have the time, in the microwave if you are lazy like me), and fill up the Icing bags. I used dark chocolate because I LOVE dark chocolate, and because it is gesund-ish ;). Aren't you supposed to eat x amount of dark chocolate every day?! (And x amount of wine, etc.)
Be creative! We (Darja and me - thanks again dear! :*) made spider legs, and spider webs.
We also used an apple and cut out round pieces, dunked it in chocolate, and used it as the spider's body.
Once the cheesecakes are cooled down, place the decorations onto the cheesecakes ("glue" the legs to the spider body with chocolate), and DONE :)


At first, I thought that these images were from google or something but then found out that these are actual images of you making these cheese cakes!! Awesome!!
ReplyDeleteyou mean "kaesekuchen";) - and "aww - thank you" btw :))
DeleteI have lived in Germany for over 7 years and tried your recipe. It took me back to the Fatherland. I really am a kaesekuchen aficionado and really enjoyed the post. Keep 'em coming. Great picture; recipe is easy to follow.
ReplyDeleteWow, they look really good! I am a huge fan of cheesecake.. You should try a slice of cheesecake from Dessert Oasis in downtown Rochester sometime. Or, you can come into O'Connor's and try it… we get all of our cheesecake fresh-baked from there!
ReplyDeleteWow these look great and they look really cool to! This is a nice blog to follow if I was wanting to make these, I like the pictures that go along with it showing me what I need to do in order to get the results that you did!
ReplyDeleteThis comment has been removed by a blog administrator.
ReplyDeleteThis comment has been removed by a blog administrator.
ReplyDeleteLove the creative design! looks delish
ReplyDeleteI attempted my first cheesecake the other day. It was a no bake recipe but tasted great. I want to keep trying new recipes!
ReplyDelete