Thursday, October 22, 2015

Käsekuchen aka German Cheesecake

I bet you ALWAYS wanted to know how to make an authentic German Cheesecake (with a Halloween-y twist)? You might be wondering: What is the difference between a German and an American Cheesecake? 

Well, for one, the German recipe is my mom's recipe, and we all know that mom's and grandma's are just the BOMB when it comes to cooking and baking;) Secondly: My Cheesecake recipe is made with Greek Yogurt instead of cream cheese and is WAY less sweet than the American version!
(Short excursion to Christmas 2014, when I brought home some American candy to my family in Germany, and they said they couldn't eat it because it is too sweet - hence most of the German candy or baked stuff is way less sweet than American pastry and candy)


Anyway - here are the ingredients you will need. Since I usually use metrics, I wrote down the measurements in metrics as well as in - well, American measurements (I have honestly no idea what they are called. Whoops - I am playing the German Card on that one ;) )

So here we go:

For the Dough you will need:
  • 300g (2 1/2 cups)  Flour
  • 6g (2 tsp)              Baking Powder
  • 50g (1/4 cup)        Stevia Sugar (I used this brand)
  • 1 pinch                  Salt
  • 1                          Egg
  • 1 tbsp                   Milk (I used 2% Milk)
  • 150g (1.5 sticks)   Margarine
  • 12g (1 tbsp)          Vanilla Sugar (mix together Vanilla Beans and regular                               granulated Sugar)
For the Filling you will need:
  • 2 Packages           Vanilla Pudding Powder (German Brand if possible)
  • 500ml (17 oz)       Milk (I used 2% Milk)
  • 100g (1/2 cup)      Stevia Sugar
  • 1 1/2 tbsp             Lemon Extract
  • 750g (26.5 oz)      Greek Yogurt (I used this brand)
  • 3                          Egg-whites 
  • 1                          Egg-yolk (to brush on cheesecakes later on)
For the Halloween Deco part you will need:
  • 1 package of Dark melting chocolate morsels 
  • An apple (or almonds)
  • Toothpicks
  • A decorating/icing bag / or a Ziploc bag
  • a decorating tip 
  • parchment paper
This may seem a bit overpowering since there is a lot going on in this recipe, but it is well worth it! And once you got a hang of it, you will be able to bake this Cake with your eyes closed (that might be just a liiittle over-exaggerated;)). 
For my mini Cheesecakes I used 2% Fat Milk and Greek Yogurt, but if you want to slim down the recipe some more, you can use the Fat Free version (but I don't think that Fat Free tastes as good, and it usually has a bunch of weird add-on ingredients in there). I also used Margarine, because that is a thing us Europeans do. We use Margarine for everything, because it is supposedly better for you, but there are many opposing viewpoints about this, so I will not get into this now ;).

Okay now I'll take you with me to the step-by-step process (One day I will make a YouTube video, that just seems easier to me).

For the Dough:

First of all: Preheat the oven to 395 Fahrenheit (do you just say "F"? not sure).

I will make it super easy for you: Mix together ALL ingredients. My mom would tell me that I would have to start off with the dry ingredients and then add the liquid ones, but "ain't nobody got time for that" - Sooo I just mixed everything together the way I wanted to (Yup mum, I am a rebel!;)) - and it turned out just fine!


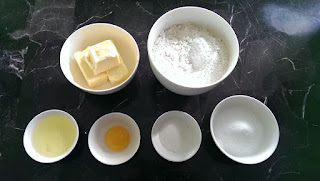
Knead the Ingredients together with your hands - this is usually the easiest way, and add as much Milk as needed, to get a firm, non-sticky dough (consistency of sugar cookie dough - which it pretty much is). You may have noticed that in the first picture I divided the egg-white and egg-yolk, and I have truly no idea why I did that - practice? Looks? Don't ask me. It seems like I am getting old ;).

This is what the dough should look like once it is done! If you used melted butter or warm butter, you need to put the dough in the refrigerator for about half an hour to be able to work with it later. 

Now it is time to pre-make and bake the dough, so it can get nice and crispy and the liquid cheesecake filling won't run through it later. Line your Cupcake tin (did I mention you DO need a cupcake tin? Nah, right? Can I blame that on my age again?..) with cupcake liners (duh), roll the dough into little balls (about 1inch diameter), and press it down on the bottom of each liner.
Done? Great! Now - for the lack of a better word: "Fork" the bottoms (this truly does not sound good - let me explain it). Use a Fork to punch some holes into the flat dough, so it does not rise and no bubbles are forming.
Once you are done with the "Forking" (that word really grows on me;))- bake the Dough for 6-7 minutes, or until it is golden brown. Take it out of the oven and let it cool down a little bit. Repeat with the rest of the dough balls.

Filling:

Now it's time to tackle the filling part (This requires either help or multitasking abilities)- My great friend Darja helped me out - she is also the hand-model in a few of the following pictures (hah! I told you I would post it ;)). 

Also: Decrease the oven heat to 305 F (I will just do it like that from now on - you know what I mean)

First of all you want to grab a clean bowl, and pour the content of the 2 Vanilla Pudding Powder Packages into it, as well as the sugar. Add some of the milk, and whisk it so it turns into a liquid (it should not be firm or creamy, otherwise you will not be able to pour it into the rest of the milk later). 


Grab a sauce pan, add the rest of the milk and let it come to a boil. Once it boils, add the Vanilla/Sugar/Milk mixture to it and STIR! Turn the stove to a medium setting and continue stirring with a whisk, until there are no lumps left anymore and the pudding mix has turned into actual pudding (creamy, not liquid anymore).

Turn off the stove and remove the sauce pan from the stove. Add the Greek Yogurt and the Lemon Extract and stir until it's well combined. At this point you can decide yourself if you want it to taste more Lemon-y (There is no raw egg involved yet, and I am super weird about raw eggs). 

Now get another bowl, add the egg-whites and beat them until they are stiff (this sounds so violent:P). Fold the stiff egg-whites into the Pudding mixture. 

Filling: check

Now that your Filling is done, add it to your cupcake tins (I filled them up almost completely)
 Bake the mini cheesecakes for 20-25 minutes. Since a toothpick test does not really work for this kind of cake, you will have to wait until the filling is rising. This means that the egg-white is expanding, which means it is cooked through (If you ask me why, I will give you my dad's favorite answer: Physics! (although in this case it might actually be chemistry, but what do I know - clueless Marketing major)).
Once the mini cheesecakes are baked, take them out of the tin and let them cool down completely. While they are cooling down, you can prepare your deco-station. 
Roll out some parchment paper, melt the dark chocolate (in the water bath if you are fancy and have the time, in the microwave if you are lazy like me), and fill up the Icing bags. I used dark chocolate because I LOVE dark chocolate, and because it is gesund-ish ;). Aren't you supposed to eat x amount of dark chocolate every day?! (And x amount of wine, etc.)
Be creative! We (Darja and me - thanks again dear! :*) made spider legs, and spider webs.
We also used an apple and cut out round pieces, dunked it in chocolate, and used it as the spider's body.
Once the cheesecakes are cooled down, place the decorations onto the cheesecakes ("glue" the legs to the spider body with chocolate), and DONE :)

Monday, October 12, 2015

Malibu-Coconut Eyeballs

Hmm October - one of my favorite months of the year. Dressing up in weird costumes, going to Haunted Houses, Zombie Shooting (because 'Murica - obviously), Apple Cider and Donuts, mmhhh - to sum it up: just too much good stuff. 
Since I am a BIG Halloween fan, I decided that my first recipe should be Gelatin/Malibu/Coconut Eyeballs you guys should make for the next Halloween party you are hosting or you go to! 

I found this recipe for the Malibu Eyeballs a while back, but decided to substitute the sugar for the Stevia Sugar mixture, since it has 75% less calories (and sugar) - and, let's be honest, around Halloween we all eat wayyy too much Candy anyway - so why not try to decrease our sugar intake a little bit wherever we can!

What you will need for this recipe:

  • 2 Envelopes of Gelatin (no flavor)
  • 1 Cup of canned full-fat Coconut milk
  • 1 Cup of Malibu Liquor
  • 1/4 cup of Stevia Sugar (I used the truvia baking blend)
Also:

  • Spherical Ice ball trays (found them here)
  • Cooking spray
  • a small sauce pan
  • a whisker
  • Gel Food Colors (I used blue, green, red, and black)
  • a small size brush for painting on the details
  • hair ties
Alright then: Hier ist die Anleitung (here are the instructions)

Pour one cup of the Coconut milk into the saucepan, and let it simmer on "low". Add both Gelatin envelopes and stir the mixture until the Gelatin has dissolved completely.

After that you want to add the Stevia Sugar Mixture and keep stirring until the sugar is dissolved as well. This will take less than a minute because Stevia usually dissolves way faster than sugar (don't ask me why though...my dad would say "physics" - but you can probably blame it on chemistry. But I was not good in either of those subjects, so just believe me and don't question it ;).

Once you have one homogenous mass, cool down the mixture to room temperature, so the alcohol does not boil away when you add the Malibu in the next step. Since I am not a patient person, I filled our sink with cold water (you can even add some ice-cubes if you are particularly impatient) and put the sauce pan in the water until the mixture was cool enough.

When the mixture is cool enough, add 1 cup of Malibu Liquor to it and stir until it has dissolved completely.
Now spray the mold with cooking spray, so you can get the eye-balls out of the mold super easily later.

Pour the mixture into the bottom part of the spherical ice-tray, so it covers 3/4 of the whole mold (see picture). You don't want to "just" fill up the holes, since you then would have to use a syringe to get the rest of the mixture into the other half of the mold. We are just pressing the top down once the mixture is in, so the mixture fills out the whole mold completely.

Press down the top of the mold and wrap hair ties around the outer sides of the mold, so there is enough pressure applied to the mold (and so you can make sure that the eyeballs turn out to be round later).
Once this is done, put the tray in the refrigerator (I put it in overnight, not sure how long it really needs to set, but I would assume that a few hours are enough - much like with Jell-O. But if you want to be on the safe side, leave it in a bit longer).

Once the eyeballs have set, take them out of the fridge, open the ice-tray and pop out the eyeballs on a plate


Use a clean (duh!) paper towel to wipe of the excess Gelatin mass on the sides of the eye-balls.
 Once the Eye-balls are clean, you can go ahead and paint them. I used Gel Food-coloring in blue, green, and Red, and Black for the iris. - Go crazy!
And here we go - squishy, boozy, healthy-ish Eye-balls:) 
Enjoy guys, and feel free to leave any comments, and don't forget to follow me on Twitter and Facebook 

Wednesday, October 7, 2015

This is me :)

This, Ladies and Gentlemen, is me - Claudia. 
Here some facts about myself, but i promise to keep it short and sweet, so I don't bore you to death before you even know what this Blog is about - we wouldn't want that, would we?

Alright then, I am a full-time student at Walsh College in Troy, MI, majoring in Marketing. I am originally from Germany (you could probably tell by looking at my picture) but moved to the States about 3 years ago to be with my (now) husband. How we met is actually a pretty funny story (This is the part for the ladies;))


Any of you fellow Michiganders remember JD's Piano Bar in Pontiac? Yea - So, I took an USA vacation in 2011 with two of my good friends, and we stopped in Detroit for 4 days (because Detroit is obviously the #1 vacation spot) to visit a buddy there. This said buddy took us
to a sketchy Piano Bar in -(as I now call it) - the "city of love": PONTIAC. In this bar I got to know my husband Nico. The funny part: Nico lives about 10 miles away from me in Germany, but we never ever met there, nor have any mutual friends. Boy - it was just meant to be, it seems:)

Okay enough romance, now to the important topic: FOOD

I really do enjoy food - a lot! And I would like to use this Blog opportunity to share some of my favorite recipes with you every week. The reason I called this Blog "Gesund-ish" (Healthy-ish) is - of course, that I am German, and I needed to put some German influence in the blog's name, AND I really fell in love with the good ol' "ish". I have no idea what I would do without it?! I even use it when I am back in Germany, but it just confuses all of my friends...Time to cultivate those Germans some more ;)

Anyway, Food - I will try to post recipes that are rather on the healthy side (I enjoy baking using Stevia instead of sugar), but there will still be unhealthy - but tasty - things involved. After all we all know that the better it tastes, the worse it is for you ;) (e.g. my beloved Bacon...)

Another thing: I will include the German name of the dish, and teach you guys a new German phrase every week, so you can brush up on your German skills:) - You're welcome.

Without further ado - let's get started! I hope you guys like my blog and recipes! If you have any suggestions or comments, feel free to tell me, and follow me on my other social media platforms!